Best Way to Upload File in Javascript
Introduction
The ability to upload files is a cardinal requirement for many web and mobile applications. From uploading your photo on social media to post your resume on a job portal website, file upload is everywhere.
Equally a web developer, we must know that HTML provides the support of native file upload with a bit of help from JavaScript. With HTML5 the File API is added to the DOM. Using that, we can read the FileList and the File Object inside information technology. This solves multiple employ-cases with files, i.e, load them locally or send over the network to a server for processing, etc.
In this article, we will discuss x such usages of HTML file upload back up. Hope you observe it useful.
TL;DR
At whatever point in fourth dimension, if yous want to play with these file upload features, you can find information technology from here,
- HTML File Upload Demo: https://html-file-upload.netlify.app/
The source code of the demo is in my Github repo. ✋ Feel gratuitous to follow as I keep the code updated with examples. Delight give a ⭐ if you discover it useful.
- Source Code Repo: https://github.com/atapas/html-file-upload
1. Simple file upload
Nosotros tin specify the input type as file to use the file uploader functionality in a web awarding.
<input type="file" id="file-uploader"> An input file type enables users with a button to upload 1 or more files. By default, it allows uploading a single file using the operating system's native file browser.
On successful upload, the File API makes it possible to read the File object using unproblematic JavaScript code. To read the File object, nosotros need to listen to the change upshot of the file uploader.
First, go the file uploader case by id,
const fileUploader = document.getElementById('file-uploader'); Then add a change event listener to read the file object when the upload completes. We become the uploaded file information from the outcome.target.files property.
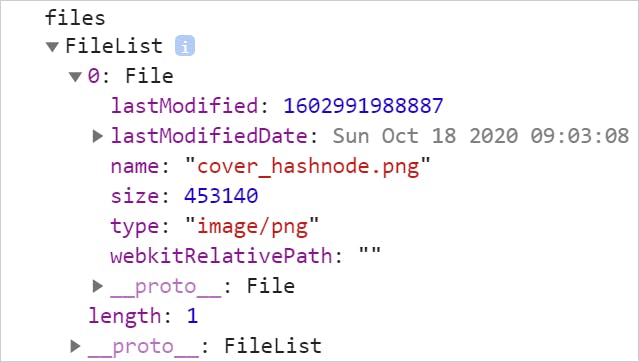
fileUploader.addEventListener('modify', (event) => { const files = event.target.files; panel.log('files', files); }); Detect the output in the browser console. Note the FileList array with the File object having all the metadata information nearly the uploaded file.
Here is the CodePen for yous with the aforementioned example to explore further
ii. Multiple file uploads
We can upload multiple files at a time. To do that, we just need to add an aspect chosen, multiple to the input file tag.
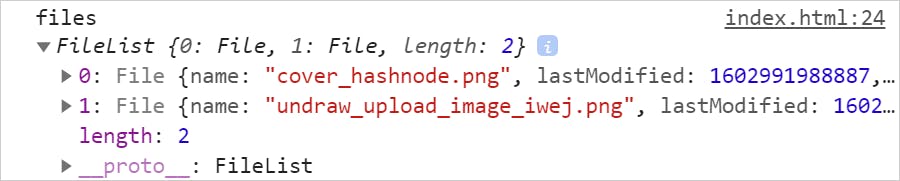
<input blazon="file" id="file-uploader" multiple /> Now, the file browser will allow you to upload one or more files to upload. Just similar the previous example, you lot tin can add a change event handler to capture the data near the files uploaded. Have yous noticed, the FileList is an array? Correct, for multiple file uploads the array will have information every bit,
Here is the CodePen link to explore multiple file uploads.
Whenever we upload a file, the File object has the metadata data similar file name, size, last update time, type, etc. This data tin can be useful for further validations, controlling.
// Go the file uploader past id const fileUploader = document.getElementById('file-uploader'); // Listen to the alter consequence and read metadata fileUploader.addEventListener('change', (event) => { // Get the FileList array const files = event.target.files; // Loop through the files and get metadata for (const file of files) { const name = file.proper noun; const type = file.blazon ? file.type: 'NA'; const size = file.size; const lastModified = file.lastModified; console.log({ file, name, type, size, lastModified }); } }); Here is the output for unmarried file upload,

Use this CodePen to explore further,
four. Know almost file take belongings
We can use the take attribute to limit the type of files to upload. You may want to show only the allowed types of images to browse from when a user is uploading a profile motion picture.
<input blazon="file" id="file-uploader" accept=".jpg, .png" multiple> In the code above, the file browser will let only the files with the extension jpg and png.
Note, in this case, the file browser automatically sets the file choice blazon as custom instead of all. However, you tin can always change information technology back to all files, if required.

Utilize this CodePen to explore the accept attribute,
5. Manage file content
You may want to prove the file content after a successful upload of it. For profile pictures, information technology will exist disruptive if we practice not bear witness the uploaded moving-picture show to the user immediately after upload.
We tin can use the FileReader object to convert the file to a binary string. And then add a load event listener to get the binary string on successful file upload.
// Go the instance of the FileReader const reader = new FileReader(); fileUploader.addEventListener('change', (upshot) => { const files = result.target.files; const file = files[0]; // Become the file object after upload and read the // data as URL binary cord reader.readAsDataURL(file); // Once loaded, do something with the string reader.addEventListener('load', (issue) => { // Hither nosotros are creating an image tag and adding // an image to it. const img = document.createElement('img'); imageGrid.appendChild(img); img.src = event.target.issue; img.alt = file.name; }); }); Try selecting an image file in the CodePen below and see it renders.
6. Validate file size
As we have seen, nosotros can read the size metadata of a file, nosotros tin really use it for a file size validation. You may allow users to upload an epitome file up to 1MB. Let united states of america see how to achieve that.
// Listener for file upload change event fileUploader.addEventListener('change', (event) => { // Read the file size const file = issue.target.files[0]; const size = file.size; let msg = ''; // Cheque if the file size is bigger than 1MB and prepare a bulletin. if (size > 1024 * 1024) { msg = `<bridge style="color:blood-red;">The immune file size is 1MB. The file you are trying to upload is of ${returnFileSize(size)}</span>`; } else { msg = `<span style="color:light-green;"> A ${returnFileSize(size)} file has been uploaded successfully. </bridge>`; } // Show the bulletin to the user feedback.innerHTML = msg; }); Endeavor uploading a file of different sizes to come across how the validation works,
7. Show file upload progress
The better usability is to permit your users know about a file upload progress. We are at present aware of the FileReader and the effect to read and load the file.
const reader = new FileReader(); The FileReader has another event called, progress to know how much has been loaded. Nosotros can employ HTML5's progress tag to create a progress bar with this information.
reader.addEventListener('progress', (issue) => { if (outcome.loaded && consequence.total) { // Calculate the pct completed const percent = (event.loaded / event.total) * 100; // Set up the value to the progress component progress.value = percent; } }); How about you lot try uploading a bigger file and come across the progress bar working in the CodePen below? Give it a try.
8. How about directory upload?
Tin we upload an unabridged directory? Well, information technology is possible but with some limitations. There is a not-standard attribute(at least, while writing this commodity) called, webkitdirectory that allows u.s.a. to upload an entire directory.
Though originally implemented only for WebKit-based browsers, webkitdirectory is also usable in Microsoft Edge likewise equally Firefox 50 and later. Nevertheless, even though information technology has relatively broad back up, it is still non standard and should not be used unless you have no culling.
You can specify this attribute as,
<input type="file" id="file-uploader" webkitdirectory /> This will allow yous to select a binder(aka, directory),

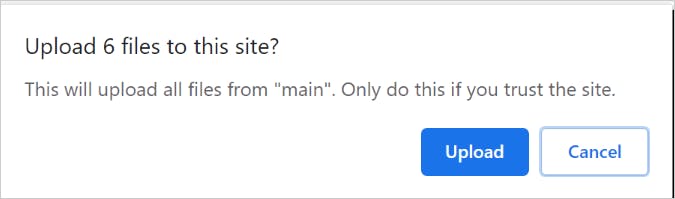
User has to provide a confirmation to upload a directory,
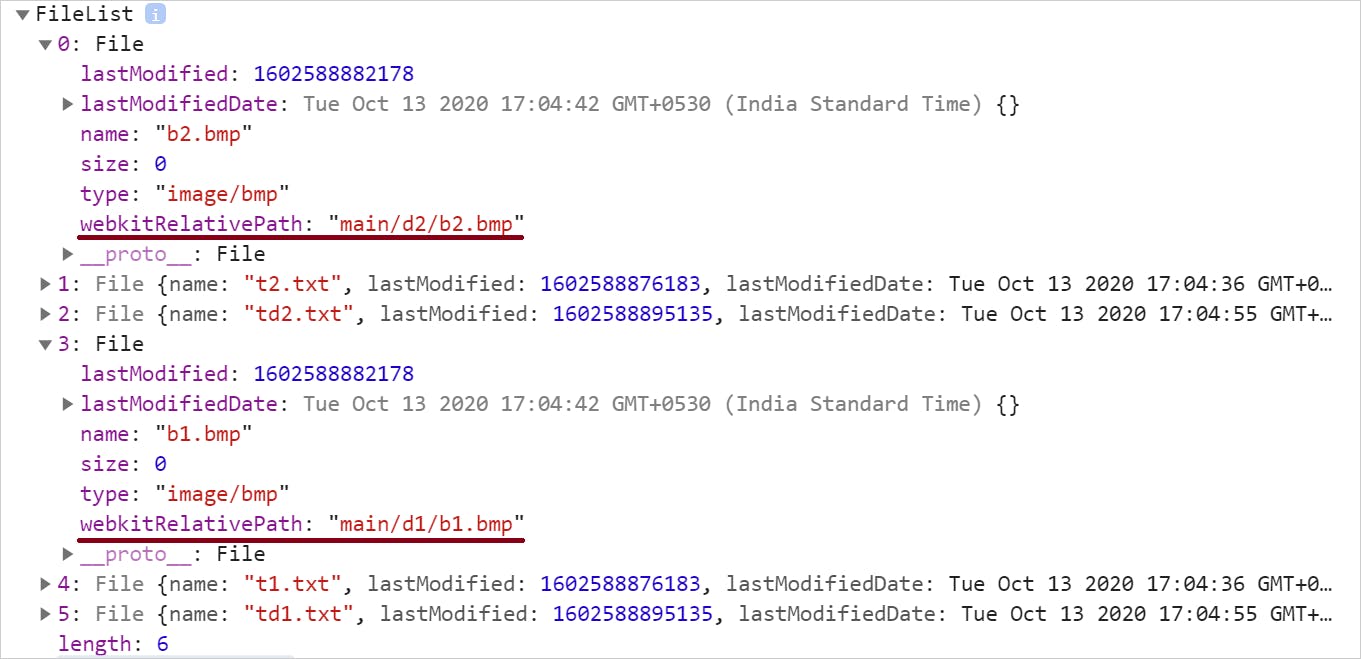
Once the user clicks the Upload push, the uploading takes place. One important betoken to annotation here. The FileList assortment will have information about all the files in the uploaded directory as a flat construction. Just the fundamental is, for each of the File objects, the webkitRelativePath attribute will have the directory path.
For example, let us consider a main directory and other folders and files under it,
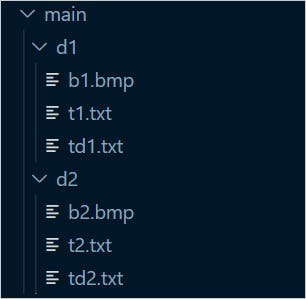
Now the File objects will accept the webkitRelativePath populated equally,
You can use it to render the binder and files in any UI construction of your option. Use this CodePen to explore further.
9. Let's drag, drib and upload
Not supporting a elevate-and-drop for file upload is kinda old fashion, isn't it? Let us run across how to attain that with a few elementary steps.
Kickoff, create a drop zone and optionally a section to show the uploaded file content. We volition utilize an image as a file to elevate and drop here.
<div id="container"> <h1>Drag & Drib an Image</h1> <div id="drop-zone"> DROP HERE </div> <div id="content"> Your prototype to announced here.. </div> </div> Get the dropzone and the content areas past their corresponding ids.
const dropZone = document.getElementById('drib-zone'); const content = document.getElementById('content'); Add a dragover issue handler to show the outcome of something going to be copied,
dropZone.addEventListener('dragover', event => { result.stopPropagation(); effect.preventDefault(); event.dataTransfer.dropEffect = 're-create'; }); 
Next, ascertain what we want to practice when the image is dropped. Nosotros will demand a drib event listener to handle that.
dropZone.addEventListener('drop', event => { // Get the files const files = outcome.dataTransfer.files; // At present we tin can exercise everything possible to evidence the // file content in an HTML element similar, DIV }); Effort to drag and drop an epitome file in the CodePen example below and see how it works. Do not forget to see the code to render the dropped image equally well.
x. Handle files with objectURLs
There is a special method called, URL.createObjectURL() to create an unique URL from the file. You can also release it by using URL.revokeObjectURL() method.
The DOM
URL.createObjectURL()andURL.revokeObjectURL()methods let y'all create simple URL strings that can be used to reference any data that can be referred to using a DOM File object, including local files on the user's computer.
A uncomplicated usage of the object URL is,
img.src = URL.createObjectURL(file); Apply this CodePen to explore the object URL farther. Hint: Compare this arroyo with the arroyo mentioned in #5 previously.
Decision
I truly believe this,
Many times a native HTML feature may be plenty for u.s.a. to deal with the employ-cases in hands. I establish, file upload is one such that provides many cool options by default.
Allow me know if this commodity was useful to you lot by commenting below. You may also similar,
- x useful HTML5 features, you may not be using
- I made a photograph gallery with CSS animation. Here's what I learned.
- x lesser-known Web APIs you may want to apply
If it was useful to y'all, delight Similar/Share and then that, information technology reaches others equally well. Please hit the Subscribe button at the elevation of the page to become an e-mail notification on my latest posts.
You can @ me on Twitter (@tapasadhikary) with comments, or feel free to follow me.
Source: https://blog.greenroots.info/10-useful-html-file-upload-tips-for-web-developers
0 Response to "Best Way to Upload File in Javascript"
Post a Comment